Configuring the Integrations Component and Plugin
This topic describes how to configure the Integrations Component and install the Boomi EmbedKit plugin in your application.
Configuring the Integrations Component
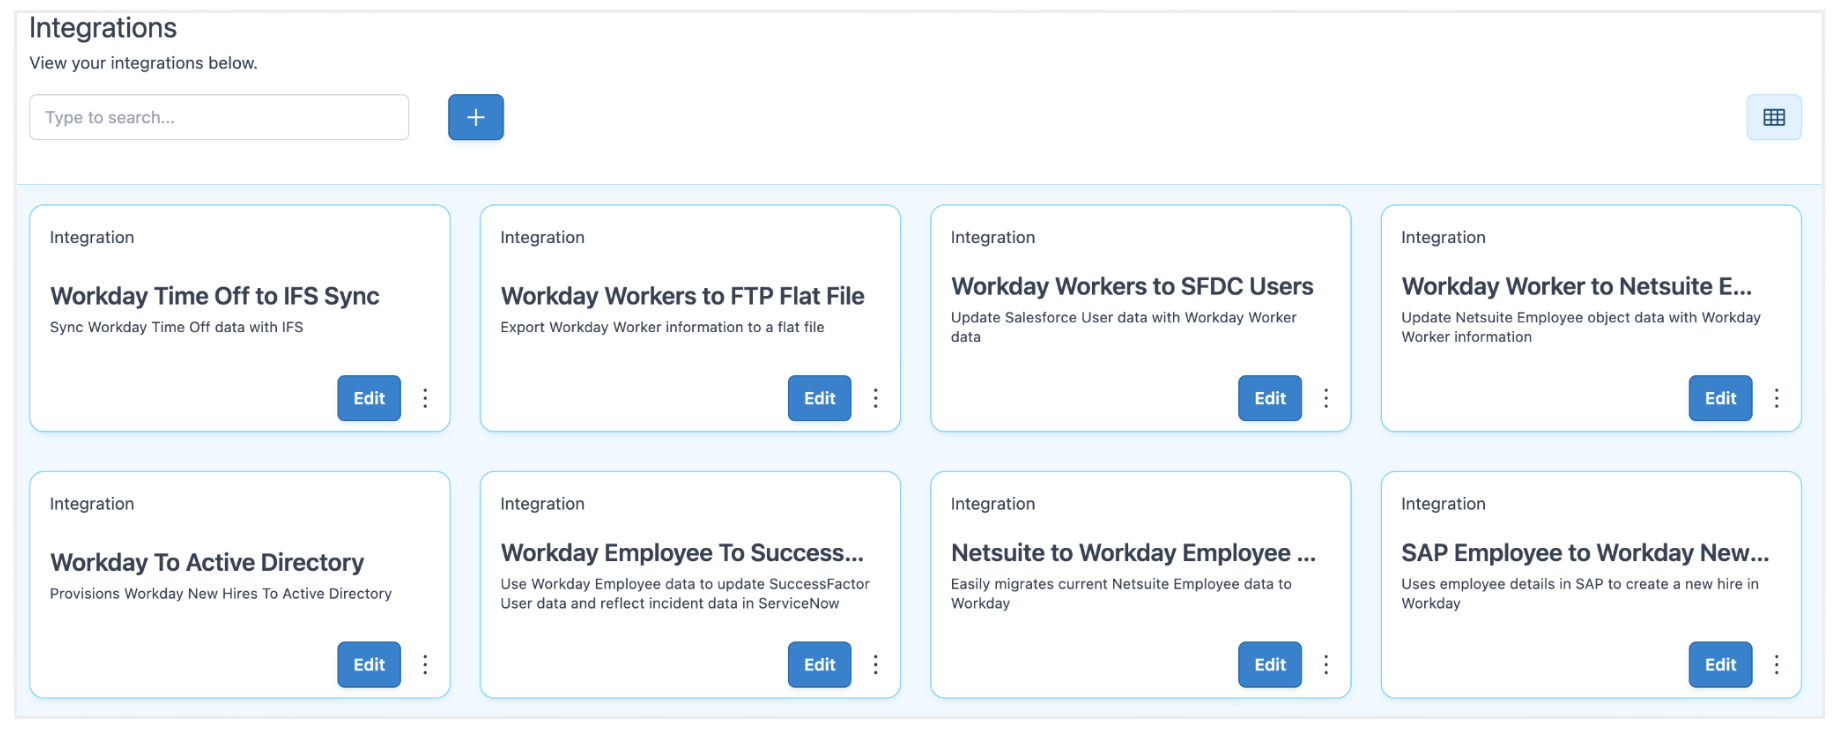
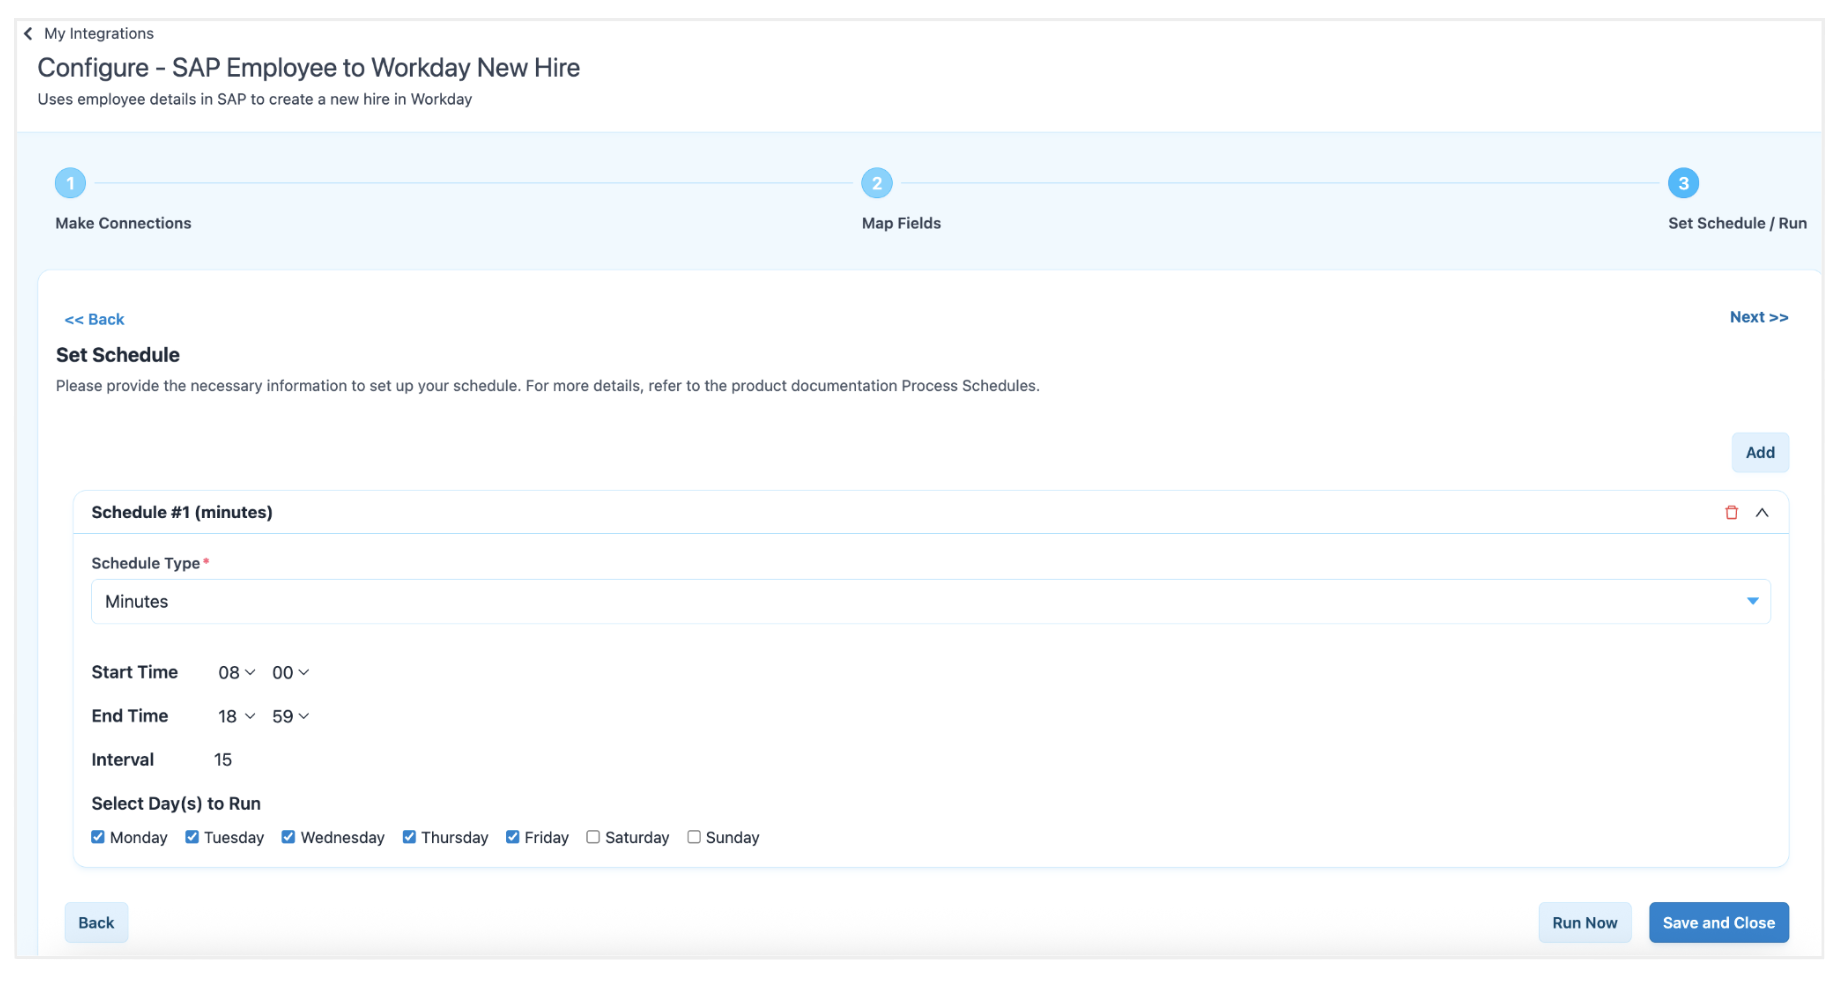
The Integrations Component is a complete user interface that you can embed in your application. It simplifies the process of connecting, mapping, and orchestrating Integration Packs that you configure in Boomi. This component enables end users and citizen integrators to manage integrations directly within your custom SaaS application. The following images show the key capabilities of this component.
The Integrations home page displays different integration cards
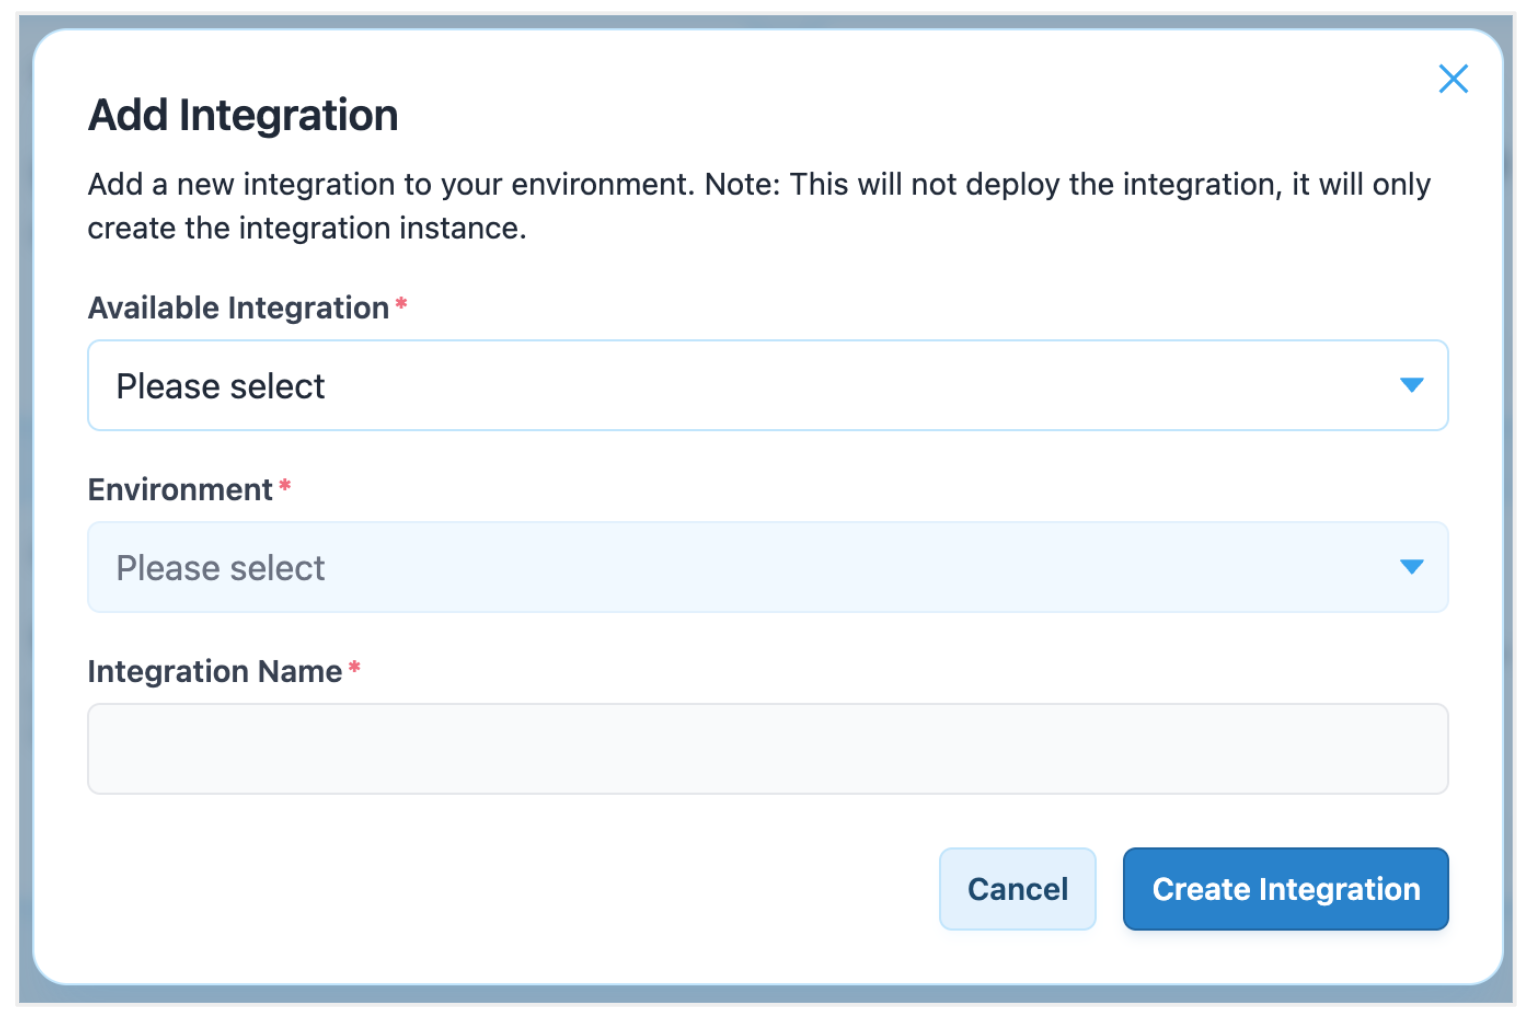
Adding integration to your UI portal
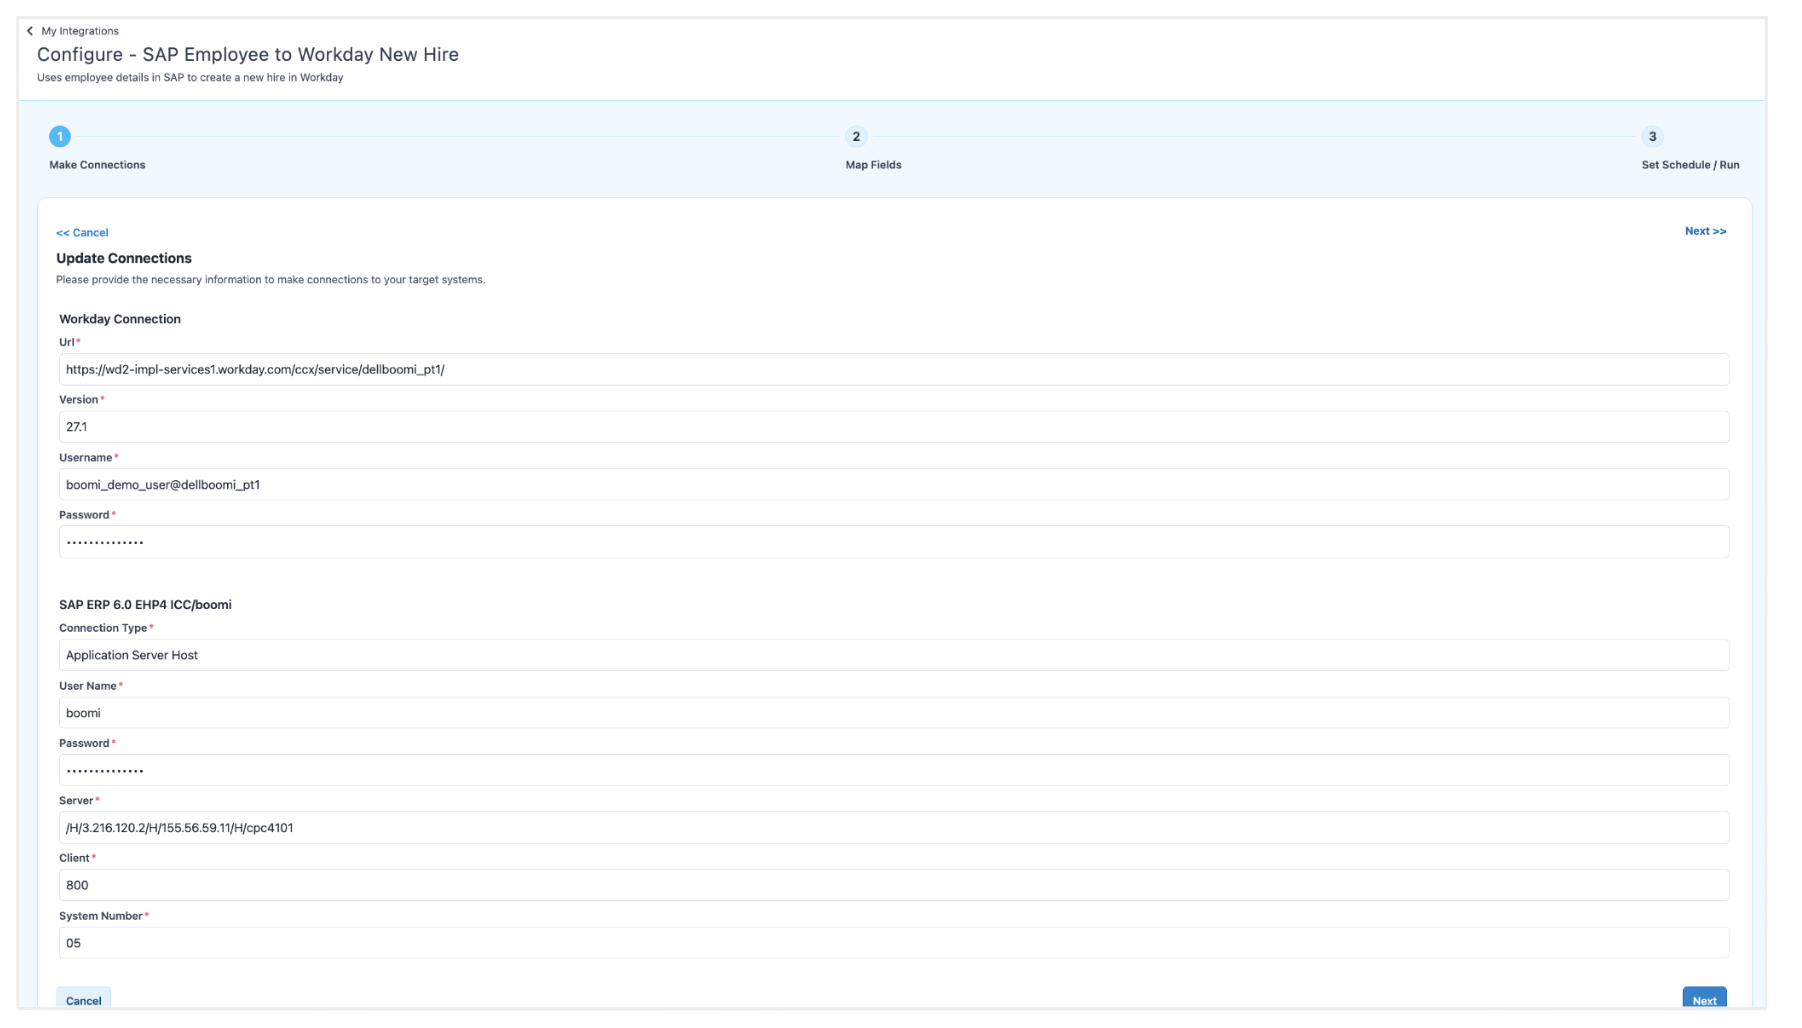
Configure connection details for the source and target systems
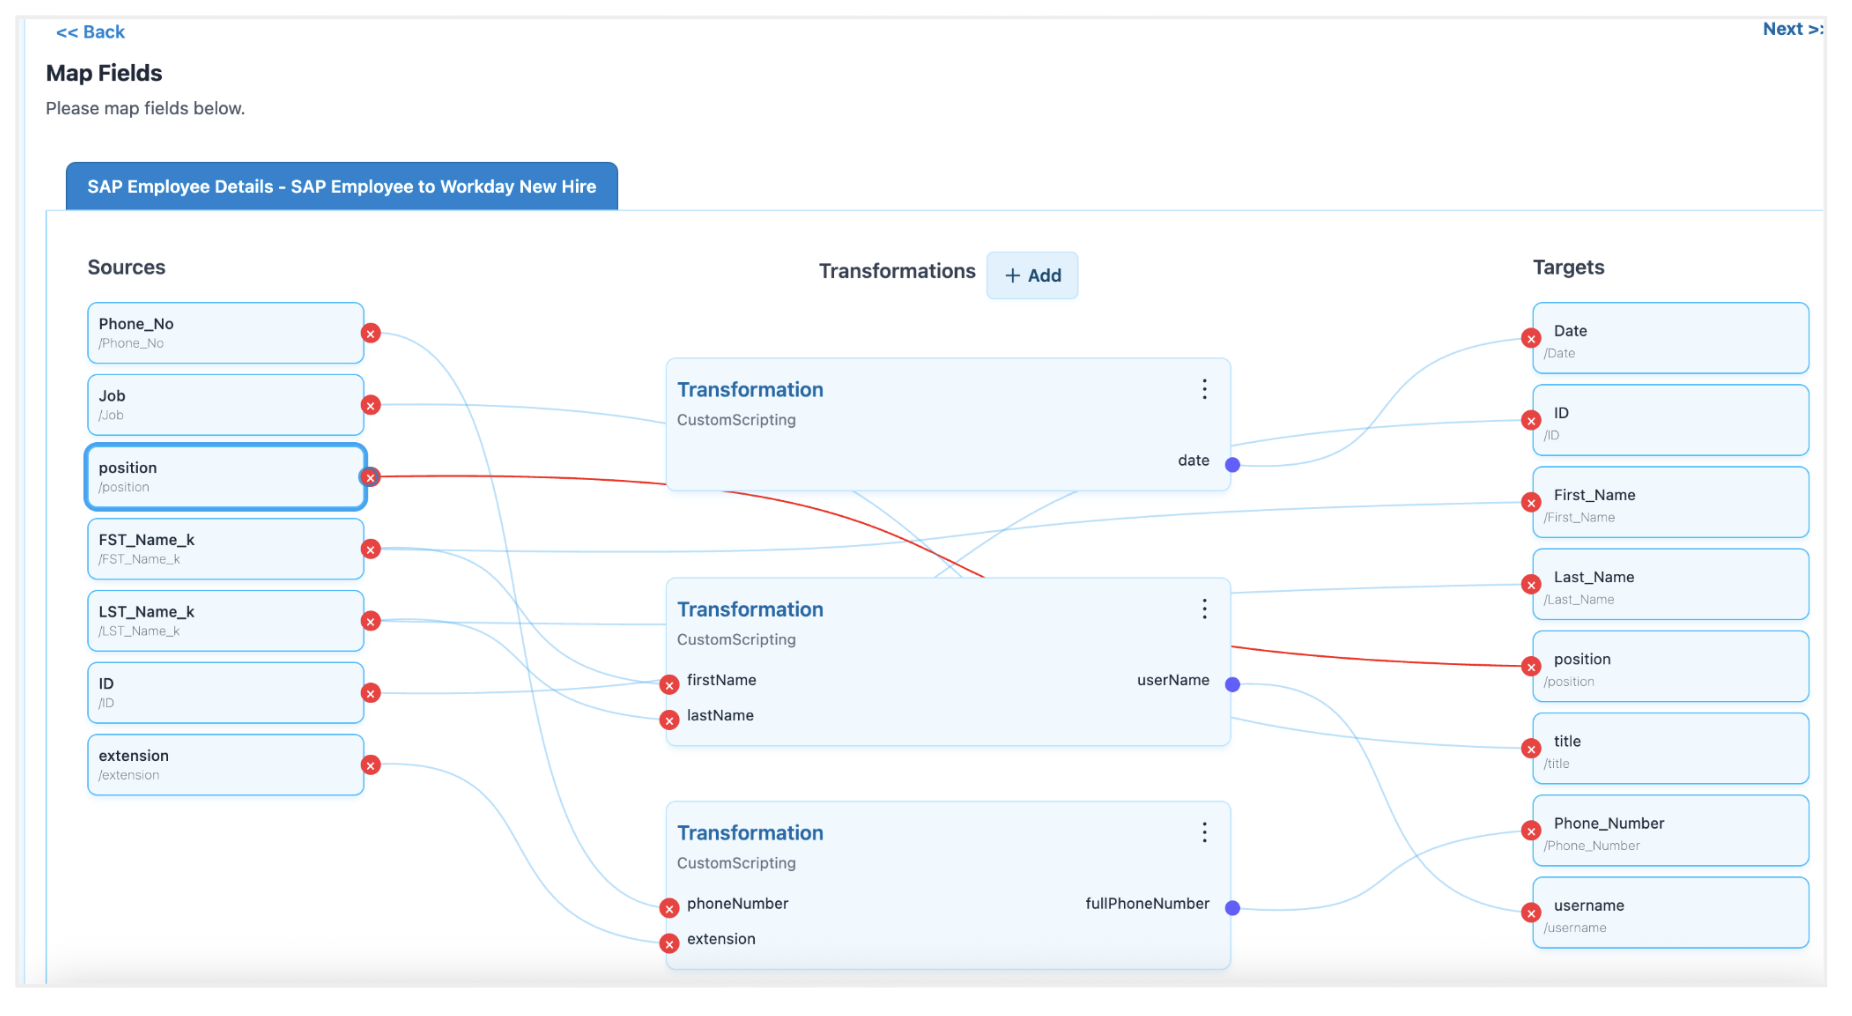
Mapping data fields between the source and target systems
Set your integration to run immediately or schedule it for later
You can fully customize the component user interface. For more information, refer to the Customizing your styling and themes topic.
Install and configure the Plugin
This section describes how to install and configure the Boomi EmbedKit plugin in your application.
Prerequisites for the Plugin
Before you install the plugin, ensure that you have the following:
- npm installed on your system
- A web application that uses React, CommonJS, or another JavaScript UI framework
- A Parent and Child account structure is enabled in the Boomi platform
- Each user using the EmbedKit must have an assigned sub-account under your primary Boomi account. These can be generated programmatically within your application using the Boomi Platform API
- A web application and server that can make HTTP calls to the EmbedKit API
- For authentication, your SaaS application's user records must include the Boomi sub-account IDs and account group. These values are required to be passed to the plugin for authentication
- You must generate a Platform API Token within the Boomi Platform. For more information, refer to the Platform API Tokens overview topic
- To allow the EmbedKit server to communicate with your web application, you must configure a Cross-Origin Resource Sharing (CORS) policy for your application origins and Boomi Parent Account ID (tenantId). This can be done using:
- Self-service: Configure the IP/URL CORS policy in your parent account in Boomi. For more information, refer to the Account security for CORS topic
- Support request: Contact Boomi Support or the Boomi Embedded team and provide a list of all known origins to add to the allowlist.
Install the Plugin
To install the EmbedKit package, run the following command:
npm i @boomi/embedkit
Set up the plugin
You must initialize the Boomi plugin in your application to render the user interface components. The configuration consists of two parts: Server-side and Client-side.
The following sections describe the expected flow of information from your client and server to the EmbedKit.
Server-side configuration
The following example shows a Node.js endpoint that handles POST requests from your web application client.
Your tenantId is your Boomi Parent Account Id. You can find this value in the Boomi Platform. Review all requirements in this topic before you develop your solution.
Server-side example
/* API to handle auth requests to this server */
app.post('/api/session', async (req, res) => {
  /**
   * Authenticate you user against your DB. Note: in this example we are
   * using MongoDb and looking the user up by the email address.
   * Once found we compere the password provided during login.
   **/
  const { email, password } = req.body || {};
  const user = await Users.findOne({ email });
  if (!user || user.password !== password) {
    return res.status(401).json({ error: 'Invalid Credentials.' });
  }

  /**
   * Build the Boomi credential payload (server-to-server only).
   **/
  const boomiPayload = {
    url: env.BOOMI_PLATFORM_URL,                    // Boomi Platform API Endpoint. Example: https://api.boomi.com/partner/api/rest/v1
    parentAccountId: env.BOOMI_PARENT_ACCOUNT_ID,   // Boomi Parent Account Id. Get this from Boomi Platform.
    apiUserName: env.BOOMI_API_USER_NAME,           // Boomi api username. Get this from Boomi Platform. Note: Must come from the parent account
    apiToken: env.BOOMI_API_TOKEN,                  // Boomi Api token, Get this from Boomi Platform. Note: Must come from the parent account
    childAccountId: user.boomi_account_id,          // or however this data is stored on your user record
    accountGroup: user.boomi_account_group,         // or however this data is stored on your user record
    oauth2: config.oauth2,                          // If you require oauth2 connections this information is required
    oauth2: {                                       // Optional: If you require oauth2 connections this information is required
      connections: {
        'INTEGRATION_PACK_ID': {                    // The connection id for this oauth2 connection. Note: This can be found easily in Boomi.
          clientId: 'CLIENT_ID',                    // The client id provided by the IDP
          clientSecret: 'CLIENT_SECRENT',           // The client secret provided by the IDP
        },
      },
    ai: {                                           // Optional: To enable AI features this information must be provided.
      enabled: true,
      model: 'gpt-4o-2024-08-06',                   // The openAi model to leverage, openAi is the only supported LLM at this point in time.
      apiKey: ('API_KEY',                           // Your openAi api key.
      url: 'BOOMI_LISTENER_URL',                    // The listener url. Note: this can be found in the runtime configuration.
      userName: 'BOOMI_LISTENER_USER',              // The listener user name. Note: this can be found in the runtime configuration.
      userToken: 'BOOMI_LISTENER_PASSWORD',         // The listener user password. Note: this can be found in the runtime configuration.
    },

  };

  /**
   * Call the auth/login endpoing on the EmbedKit Server to obtain a one time use HMAC nonce.
   * The nonce has a TLS of 2 minutes.
   **/
  try {
    const origin = req.headers.origin || '';
    const r = await fetch(`${env.EMBEDKIT_SERVER_BASE}/auth/login`, {
      method: 'POST',
      credentials: 'include',
      headers: {
        'Content-Type': 'application/json',
        'Origin': origin,
        'X-Tenant-Id': config.boomi_primary_account || '',
      },
      body: JSON.stringify(boomiPayload),
    });

    if (!r.ok) {
      const errText = await r.text().catch(() => '');
      return res.status(r.status).json({ error: 'Login Failed', detail: errText });
    }
    const { nonce, ttlSec } = await r.json();

    /**
     * Return the nonce to your user interface. The nonce will be used to create a plugin instance.
     **/
    return res.json({ nonce, ttlSec, serverBase: EMBEDKIT_SERVER_BASE, tenantId: config.boomi_primary_account });
  } catch (e) {
    return res.status(502).json({ error: 'EmbedKit Server Unreachable.' });
  }
});

// Logout (host app)
app.delete('/api/session', (req, res) => {
  res.clearCookie('sid', cookieOptions(req));
  res.json({ ok: true });
});
Client-side configuration
The following example shows how to integrate the EmbedKit in a CommonJS web application client.
-
Create an HTML div element on the page where you want to render the Boomi EmbedKit components. The div element must have an ID of boomi.
  <body>
    <div id="boomi"></div>
</body> -
Initialize the plugin in your application. You can use a script tag or a separate
.jsfile.index.html
<!doctype html>
<html lang="en">
  <head>
    <meta charset="UTF-8" />
    <meta name="viewport" content="width=device-width, initial-scale=1.0" />
    <title>Boomi EmbedKit</title>
  </head>
  <body>
    <div id="boomi"></div>
    <script type="module" src="./index.js"></script>
  </body>
</html> -
Create the BoomiPlugin instance and render a component. Pass the required credentials to the plugin.
noteThe following example shows how to call the example server API within a CommonJS component.
BoomiPlugin
import BoomiPlugin from '@boomi/embedkit'; // import the embedkit
import uiConfig from './boomi.config';    // import the local config data

// set a variable to ensure the plugin is initalized prior to attempting to call RenderComponent
let boomiReady = null;

/* Used by the example app to auth the user */
async function login(email, password) {
  if (!email || !password)
    return { ok: false, message: 'Email and password are required.' };

  // call the function to authenticate the user
  const res = await serverLogin(email, password);
  if (!res.ok) return res;

  await initBoomiFromServer(res.data);
  return { ok: true };
}

/* Login based on server side call above */
async function serverLogin(email, password) {

  // call the server with the creds
  const res = await fetch(`${import.meta.env?.VITE_SERVER_URL}/api/session`, {
    method: 'POST',
    headers: { 'Content-Type': 'application/json' },
    credentials: 'include',
    body: JSON.stringify({ email, password }),
  });

  // if not successful throw and error
  if (!res.ok) {
    const msg = data?.error || data?.message || raw?.slice(0, 200) || 'Unable to sign in.';
    return { ok: false, message: msg };
  }

  // read the data if we succeeded
  const ct = res.headers.get('content-type') || '';
  const raw = await res.text();
  let data = null;
  if (ct.includes('application/json')) {
    try { data = JSON.parse(raw); } catch {}
  }

  // return the data
  return { ok: true, data };
}

/* Logout to destroy the embedkit session when the user logs out of the host application. */
async function logout() {
  boomiReady = null;
  // example server logout call to authService
  await serverLogout();
  DestroyPlugin({ removeHost: true, clearTheme: true, clearAuth: true });
}

/* Call to handle the server side logout base on the logic above.  */
async function serverLogout() {
  try {
    await fetch(`${import.meta.env?.VITE_SERVER_URL}/api/session`, {
      method: 'DELETE',
      credentials: 'include',
    });
  } catch {}
}

/* Uses the nonce from the server call above to intialize the plugin. This mints a JWT Token. */
async function initBoomiFromServer(res) {
  BoomiPlugin({
    serverBase: res.serverBase, // url of the Boomi partner api being used
    tenantId: res.tenantId, // parent account id
    nonce: res.nonce, // nonce from embedkit
    boomiConfig: uiConfig, // the content of the boomi.config.js file
  });

  /* set the boomi ready flag to ensure we don't try to render
  * a component before the plugin is fully initialized
  */
  boomiReady = new Promise((resolve) => requestAnimationFrame(resolve));
  return boomiReady;
}

/* Forces the wait for boomiReady  */
function runAfterBoomiReady(fn) {
  (boomiReady || Promise.resolve()).then(fn);
}

/* Used as a single function to render plugin components, utility with promise.  */
let __boomiRenderNonce = 0;
function renderBoomiComponent({ hostId, component, props = {} }) {
  __boomiRenderNonce += 1;
  runAfterBoomiReady(() =>
    RenderComponent({
      hostId, // in this example it would be 'boomi'
      component, // the name of the component to render 'Integrations'
      props: { ...props, __refresh__: __boomiRenderNonce }, // any config props like componentKey
    })
  );
}

/* ----- Renders a dashboard widget with an embedkit component ----- */
function renderDashboard(node) {
  node.innerHTML = `
    <div id="boomi">
      <p>Load Integration History Here....</p>
    </div>
  `;
  const dashBoomi = el.qs('#boomi');
  if (dashBoomi) {
    renderBoomiComponent({
      hostId: 'boomi',
      component: 'Integrations',
      props: { componentKey: 'integration' },
    });
  }
}
Authentication and Authorization
EmbedKit does not store passwords on disk or in the Boomi Platform. The plugin initializes with the parent accountId and authToken. However, you must provide the authUser (Boomi Sub Account ID) to the plugin during initialization, along with the accountGroup that the plugin renders for the authUser. For more information about the account hierarchy in the Boomi Platform, refer to the Account Group settings topic.
EmbedKit assumes that your application authenticates and authorizes your users before initializing the EmbedKit plugin. We recommend that you store the BoomiAccountId and AccountGroup in your internal user's profile, and provide this information after your application successfully authenticates and authorizes your users.
Context flow
- Your client-facing web application authenticates users against your server endpoint.
- After authentication, your server constructs the Boomi Payload as described in this topic.
- Your server sends an authentication request to the EmbedKit Server.
- If authentication succeeds, the EmbedKit Server responds with a one-time HMAC Nonce.
note
The nonce has a two-minute TLS.
- Your server returns the nonce to your web application client.
- The EmbedKit Plugin should be initialized as defined in this topic, with the nonce provided as one of the arguments.
- The EmbedKit Plugin exchanges the nonce for a JWT.
note
The token has a TLS of 10 minutes. The EmbedKit handles all refreshes automatically.
- The EmbedKit Server generates the JWT and an RT Cookie.
- To render an EmbedKit Component, call the provided RenderComponent method as described in this topic.
- If the user ends their session on your web application client, call auth/logout on the EmbedKit Server endpoint.
Rendering the Integrations Component
Each EmbedKit component has a number of predefined configuration options that you can pass when the component renders. You pass these options through properties. For more information about the available options for each component, refer to the EmbedKit SDK section.
The properties available for each component vary. For more information, refer to the EmbedKit SDK. However, each component supports the following properties:
@property {boolean} showTitle - Whether the component title should be displayed.
@property {string} [title] - Optional text for the component title.
@property {boolean} showDescription - Whether the component description should be displayed.
@property {string} [description] - Optional text for the component description.
Use the following code to render the component. The component renders within the div element mentioned earlier:
<div id='boomi'>{component will render here with full context}</div>
Use the following JavaScript to render the component:
Integrations
import { RenderComponent } from '@boomi/embedkit';
  RenderComponent({
    targetId: 'boomi',                  // optional: override to target a different div than id="boomi"
    component: 'Integrations',          // required: the name of the component to render
    props: {
      componentKey: 'integrationsMain', // optional: configure more than one component of the same type
      }
  });
Building your own component using hooks
The EmbedKit exposes several hooks. You can use these hooks to build your own components within your React application. These hooks require the EmbedKit PluginContextProvider.
The current hooks implementation requires React. Your application must wrap the hook usage in the EmbedKit PluginContextProvider. To view a list of hooks, refer to the EmbedKit SDK Hooks topic.
Wrapping your app (or a subtree) with the provider
To use one of the provided hooks in your React application, wrap your app with the PluginContextProvider as shown:
PluginContextProvider
  import React from 'react';
  import ReactDOM from 'react-dom/client';
  import { EmbedKitProvider } from '@boomi/embedkit';
  import App from './App';

  ReactDOM.createRoot(document.getElementById('root')!).render(
    <EmbedKitProvider
      accountId="<PARENT_ACCOUNT_ID>"
      userName="<CHILD_ACCOUNT_ID_OR_USERNAME>"
      token="<BOOMI_API_TOKEN>"
      authUser="<CHILD_ACCOUNT_ID_OR_USERNAME>"
      accountGroup="<OPTIONAL_GROUP>"
    >
      <App />
    </EmbedKitProvider>
  );
Using the hook inside your components
In this example, the hook returns { fetchEnvironments, environments, isLoading, error }. Call fetchEnvironments with either a classification ('PROD' | 'TEST' | 'ALL') or a specific environmentId:
App.tsx (consumer app)
  // App.tsx (consumer app)
  import { useEmbedKit } from '@boomi/embedkit';
  import { useFetchEnvironments } from '@boomi/embedkit';

  export default function App() {
    const { isReady } = useEmbedKit();
    const { fetchEnvironments, environments, isLoading, error } = useFetchEnvironments();

    React.useEffect(() => {
      if (isReady) void fetchEnvironments('ALL');
    }, [isReady, fetchEnvironments]);

    if (!isReady) return <p>Booting…</p>;
    if (isLoading) return <p>Loading environments…</p>;
    if (error) return <p style={{ color: 'crimson' }}>{error}</p>;

    return (
      <ul>
        {environments.map((e: any) => (
          <li key={e.id}>
            {e.name} – {e.classification} – {e.isActive ? 'ONLINE' : 'OFFLINE/MIXED'}
          </li>
        ))}
      </ul>
    );
  }
