Automating deployments with packaged components
Streamline your deployment process by automating packaging and deploying integration processes and components using the Boomi Platform REST API. You can integrate Boomi-built assets into your existing DevOps and CI/CD tools to automate, maintain consistency, and coordinate with non-Boomi asset releases.
Overview
The Boomi Platform provides REST and SOAP APIs to create packaged component versions and deploy processes and other deployable components programmatically. These APIs are commonly used as part of automated DevOps or change management workflows and can be invoked by external client applications such as CI/CD orchestration tools, or even by another Boomi integration process.
The following component types can be packaged and deployed:
- Process
- API Proxy
- API Service
- Certificate (public X.509)
- Custom Library
- Flow Service
- Process Route
- Processing Group
The Platform API is available to all Boomi customers and partners. You can call the Platform API from an external client application or use the Boomi connector to interact with the API from within a process.
We'll be using the Packaged Component deployment approach here. If you're still using the legacy deployment method, we recommend:
- Migrating your account to Packaged Component deployments for enhanced features and better DevOps integration.
- Updating your API clients to use the newer PackagedComponent and DeployedPackage objects.
Prerequisites
Before automating deployments, make sure you have:
- Target environments created
- Runtimes (Atom or Cloud) installed
- Runtimes attached to the respective environments
- API credentials with appropriate deployment privileges
- Component IDs for processes or other deployable components
To learn more about Boomi API authentication, refer to the Getting started with Boomi Platform APIs topic.
Workflow
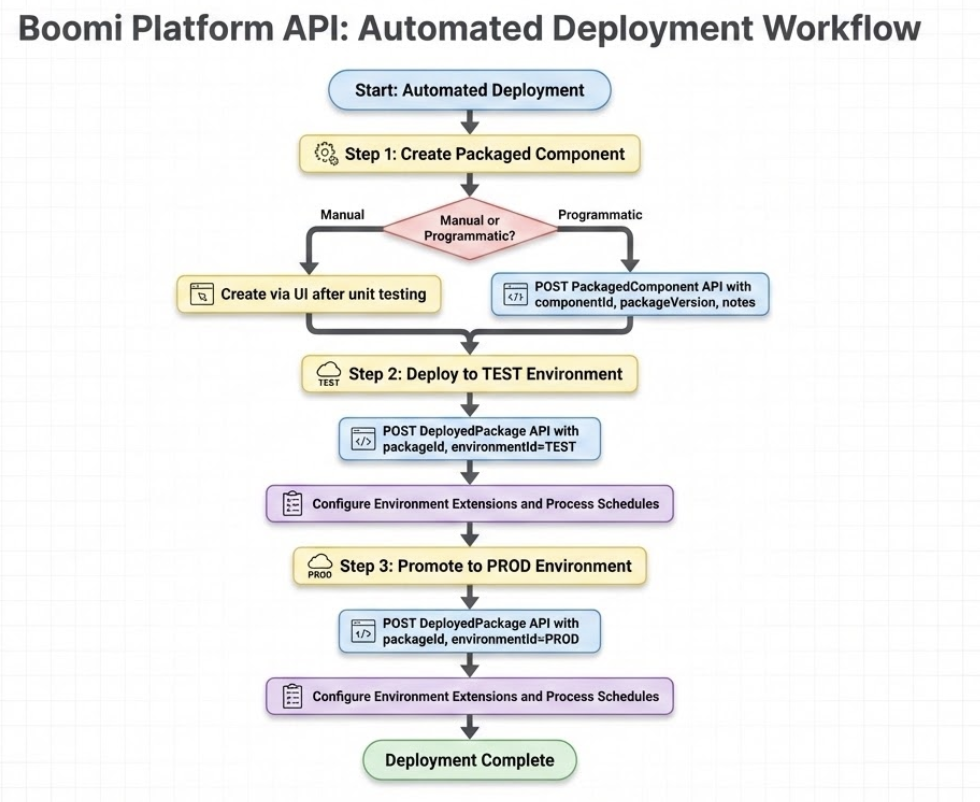
This example demonstrates packaging and deploying a process across two environments: TEST and PROD.
The following workflow shows the steps:
- Create a packaged component version after completing configuration and testing.
- Deploy the packaged component to the first environment (TEST).
- Configure environment extensions and schedules for the TEST environment.
- Promote the packaged component to the next environment (PROD).
- Configure environment extensions and schedules for the PROD environment.
Implementation
Step 1: Creating a packaged component
Create a new packaged component version after completing configuration and testing in the Build tab.
Option 1: Manual creation (recommended)
Manually create the packaged component through the user interface after successful unit testing in the Build tab. This allows more control over all components involved with the given change.
Option 2: Programmatic creation
Send a POST request to create the packaged component programmatically with componentId (process or other deployable component ID), and optionally packageVersion (user-defined alphanumeric version) and notes (user-defined notes).
For complete API details, request and response formats, parameters, and examples, refer to the PackagedComponent API reference.
Step 2: Deploying to the first environment
Deploy the packaged component to the TEST environment.
- Send a POST request to create a deployed package with
packageId(packaged component ID),environmentId(TEST environment ID), and optionallynotes(user-defined notes). - After deployment, configure environment extensions and process schedules as needed. Refer to Step 4 for environment extensions and Step 5 for process schedules.
For complete API details, request and response formats, parameters, and examples, refer to the DeployedPackage API reference.
Step 3: Promoting to the next environment
Deploy the same packaged component to the PROD environment.
- Send a POST request to create a deployed package with
packageId(same packaged component ID from Step 2),environmentId(PROD environment ID), and optionallynotes(user-defined notes). - After deployment, configure environment extensions and process schedules as needed. Refer to Step 4 for environment extensions and Step 5 for process schedules.
For complete API details, request and response formats, parameters, and examples, refer to the DeployedPackage API reference.
Step 4: Configuring environment extensions
After deploying to a new environment, update environment extension values.
Option 1: Programmatic configuration (recommended)
- Send a QUERY request to retrieve environment extensions with
environmentId. - Overlay the desired new values.
- Send an UPDATE request with the modified environment extensions.
When updating environment extension values using the API, provide the entire set of values in the request. Partial updates are not supported. If an extended field is excluded in the update, the value will be removed. The only exception is encrypted password fields.
Option 2: Manual configuration
Configure environment extension values through the user interface.
For complete API details, request and response formats, parameters, and examples, refer to the EnvironmentExtensions API reference.
Step 5: Configuring process schedules
For scheduled processes, configure schedules for each runtime in the target environment.
- Send a QUERY request to retrieve environment runtime attachments with
environmentId. - For each
atomIdreturned, send a QUERY request to retrieve process schedules withatomId(target runtime ID) andprocessId(process ID to schedule). - Send an UPDATE request for each desired process with
id(process schedule ID),atomId(target runtime ID), andprocessId(process ID to schedule).
For complete API details, request and response formats, parameters, and examples, refer to the ProcessSchedules and EnvironmentAtomAttachment API references.
Additional considerations
-
Use the Boomi connector when interacting with the API from within a Boomi process.
-
Implement business logic to enforce environment-promotion sequencing. For example, use decision shapes to ensure a packaged component version can only be deployed to PRODUCTION if it is currently deployed in STAGE.
-
When updating environment extension values, provide the complete set of values in the request. Partial updates are not supported. If you exclude an extended field in the update, its value will be removed. Encrypted password fields are the only exception.
-
Maintain a local copy of environment names and internal IDs in your client application for convenience.
