Creating a multi-table data flow with the Data Integration API
Learn how to programmatically create a data flow that syncs multiple tables from a source connection to a target connection, then activate and run it. Use the Connections, DataFlows, Operations, and Activities APIs to build the flow, track activation, and confirm that the run completed successfully.
Overview
Teams that migrate or replicate a set of related tables (for example, an orders schema with orders, customers, products, invoices, and invoice_items) need a way to move all of them without building and maintaining a separate flow per table.
The Data Integration API supports this through a single data flow (river_cross_id in the API) whose configuration lists every table to sync. Creating one multi-table flow provides:
- Fewer flows to manage - One data flow covers an entire set of related tables instead of one flow per table.
- Connection reuse - The agent or client checks for an existing source and target connection before creating new ones, avoiding duplicate credentials.
- Execution tracking - Activation and each run are asynchronous operations that return an identifier you poll until the operation reaches a terminal status.
Understanding asynchronous activation and execution
Creating a data flow only defines it. Two more calls are asynchronous and must be confirmed before you treat the flow as ready:
- Activation returns an
operation_id. Poll the Operations API until the operation status reaches a terminal value before triggering a run. - Running the flow returns a
run_id. Poll the Activities API until the run reaches a terminal status, such assucceededorfailed, to confirm the tables synced.
Activating a data flow and running a data flow are separate calls. Trigger a run only after activation reports a success status. Running an inactive flow fails.
Prerequisites
Before you create a multi-table data flow, make sure you have:
- API authentication credentials and the target
account_idandenvironment_id. - The following scopes on your token:
connection:list,connection:edit,data flow:write,data flow:execute, andoperations:list. - Connection details for the source (host, port, database, user, password) and the target (account, warehouse, database, schema, user, password).
- The list of source tables to include in the flow, with their schema names.
- A naming convention for connections you intend to reuse (for example,
<environment> <connector> - <purpose>, such asProd MySQL - orders). Checking for an existing connection in Step 1 depends on matching an exactconnection_name, so agree on and persist this name wherever you store your flow configuration.
Authentication
The Data Integration API authenticates with a Bearer token scoped to an account, environment, and set of scopes, as described in Introduction. To obtain one, either:
- Generate a token manually from the Data Integration console, as described in the Data Integration REST API overview on Help Docs, or
- Send a POST request to the Users API (
generate_boomi_token) with a Boomi platform JWT to exchange it for a Data Integration Bearer token scoped to that JWT's account and user. Passenvironment_idin the request body to scope the token to a non-default environment. For the complete request and response format, refer to the Users API reference. This JWT is the same sign-in token used across Boomi platform APIs. If you don't already have a way to obtain one, use the console-generated token above instead.
Workflow
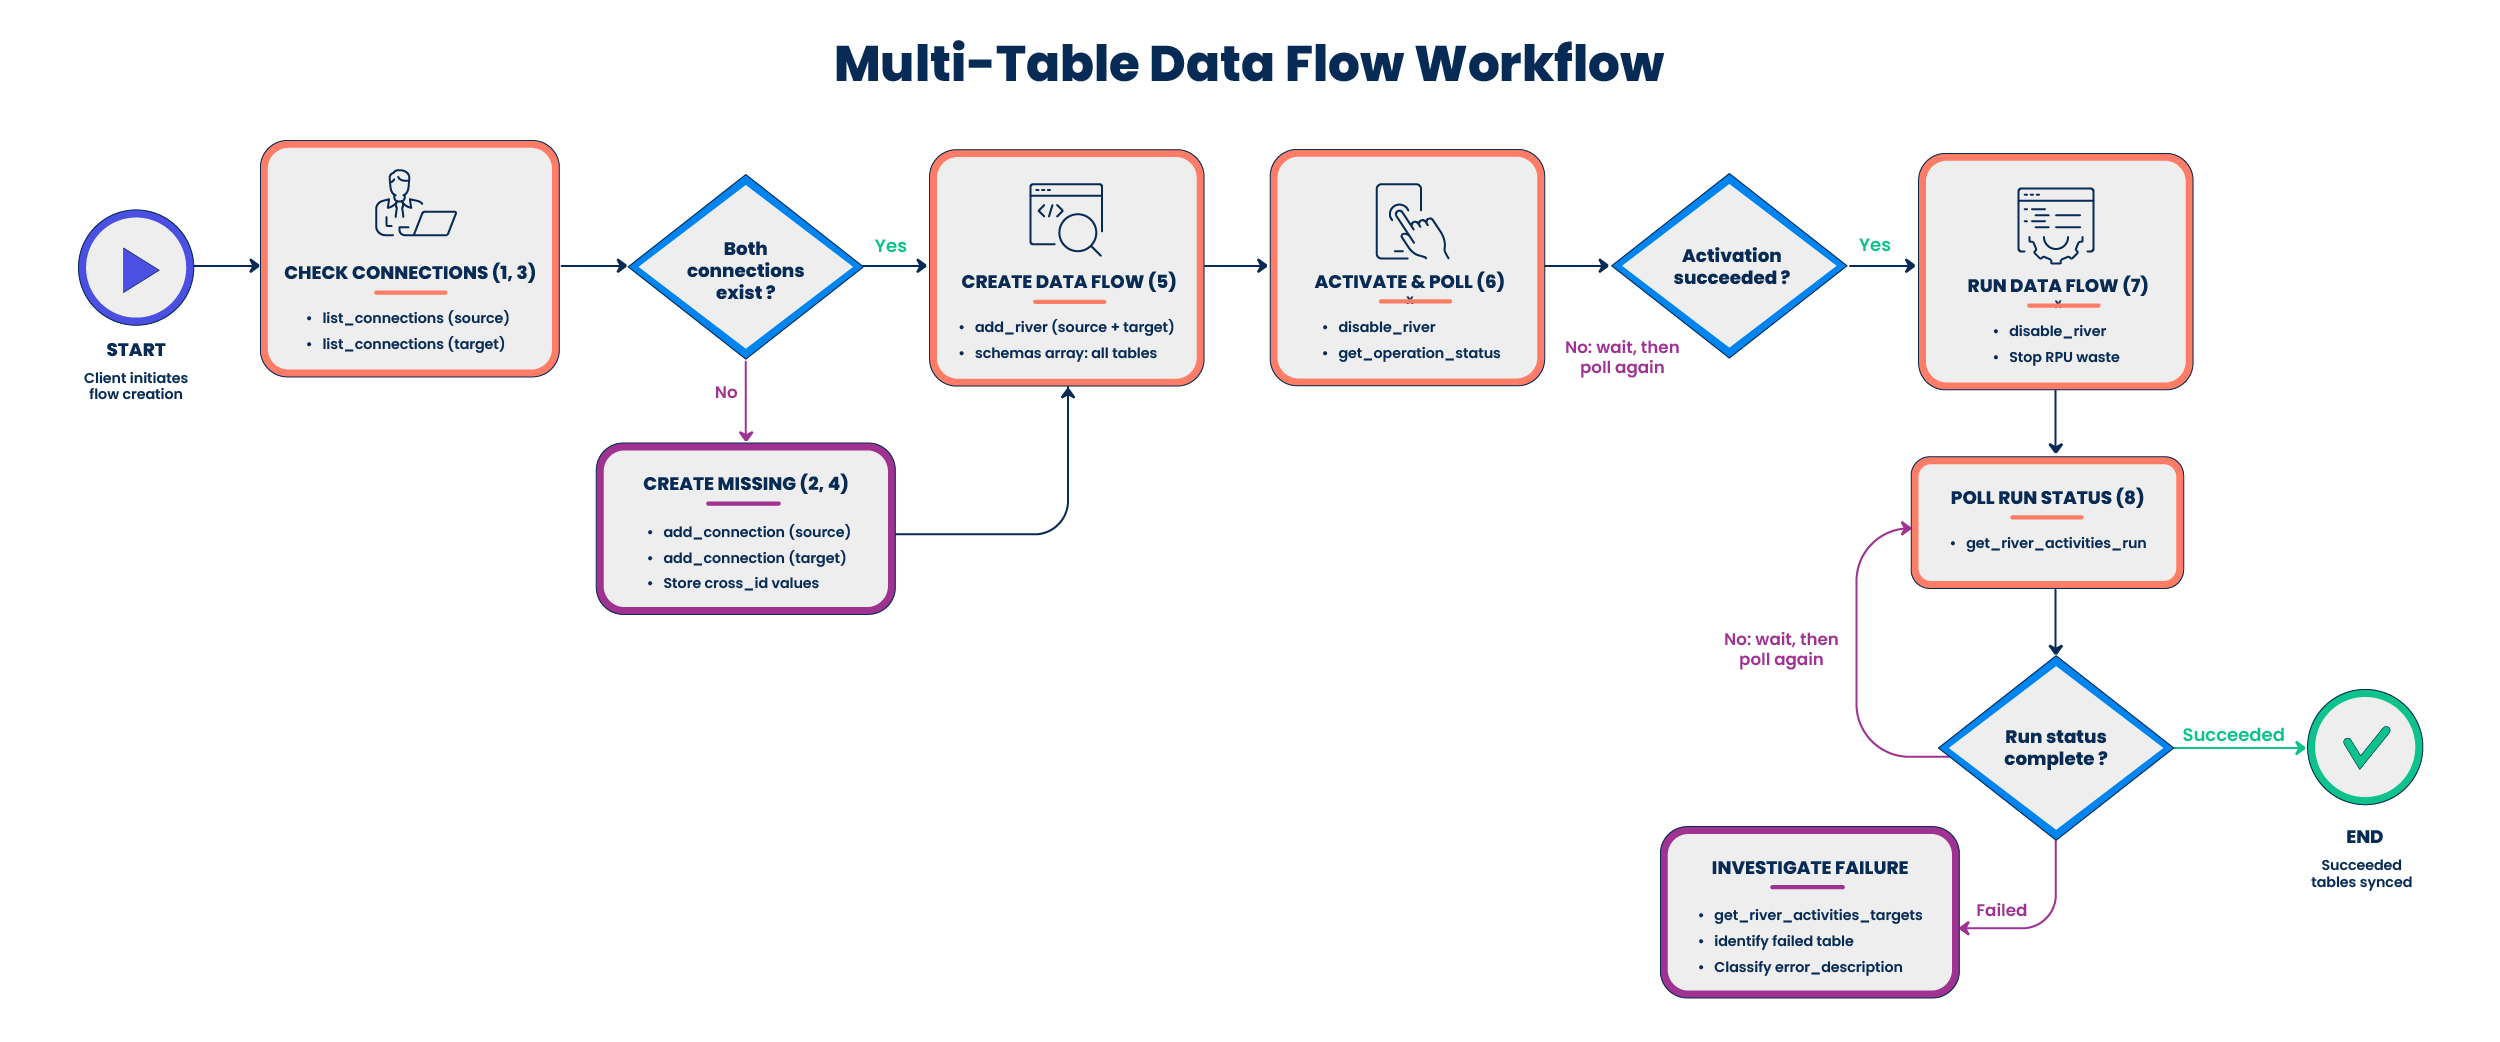
An agent or client creating a multi-table data flow follows the same sequence every time:
- Resolve the connector type for the source and target, then check whether each connection already exists. Create only the ones that are missing.
- Create the data flow with the source and target connections, covering every table to sync.
- Activate the data flow and confirm activation completed.
- Run the data flow, then poll until it reaches a terminal status.
- Confirm the result: every table synced, or identify which table needs attention.
Implementation
This workflow calls a small set of Connections, DataFlows, and Operations operations. Each operation's own reference page documents its request and response schema, and each step below states which identifier to carry forward to the next call.
Step 1: Check for an existing source connection
Send a GET request to the Connections API (list_connections) to list the connections already configured in the environment. For the complete request and response format, endpoint, parameters, and examples, refer to the Connections API reference.
The response returns each connection's connection_name and connection_type_id, but not its host, port, or database settings. Match on an exact connection_name that you already know, not on connection details.
Response details
- The
itemsarray contains each connection'scross_id,connection_name, andconnection_type_id. - If a connection's
connection_type_idmatches your source (for example,mysql) and itsconnection_namematches the connection you want to reuse, use itscross_idas the source connection ID and skip to Step 3. - If
next_pageisn't null, repeat the request with the nextpagevalue before concluding there's no match. An environment with more than 500 connections spans multiple pages. - If no matching connection exists after checking every page, continue to Step 2.
Step 2: Create the source connection
Creating a connection is two lookups followed by the create call, because the fields you need depend on the connector type.
Send a GET request to the Connections API (get_connection_source_names) to list the available source_name values. For the complete request and response format, refer to the Connections API reference.
Response details
- Each entry returns a
source_name(for examplemysql), asegment(sourceortarget), and theconnection_typeit resolves to. Don't hardcode asource_name. Read it from this response. - A
source_nameavailable for both segments (for examplesnowflake) requires you to also passsegmentin the create request to disambiguate.
Send a GET request to the Connections API (get_connection_type) with the connection_type from the previous response to get the exact fields that connector accepts. For the complete request and response format, refer to the Connections API reference.
Connectors that authenticate through an interactive browser sign-in, such as Google services or Salesforce, return no API-fillable fields here. Create those connections in the Data Integration console instead, then use this workflow's check-for-an-existing-connection step to find and reuse them.
Send a POST request to the Connections API (add_connection) to create the connection, passing source_name, segment (if needed), connection_name, and the connector-specific fields from the previous response as top-level fields. For the complete request and response format, refer to the Connections API reference.
Response details
- A successful request returns the new connection, including its
cross_id. - Store this
cross_idas the source connection ID for use in Step 5.
Step 3: Check for an existing target connection
Send the same GET request used in Step 1 (list_connections), this time checking whether a connection's connection_type_id matches your target (for example, snowflake) and its connection_name matches the connection you want to reuse. For the complete request and response format, refer to the Connections API reference.
Response details
- If a matching connection exists, use its
cross_idas the target connection ID and skip to Step 5. - If
next_pageisn't null, repeat the request with the nextpagevalue before concluding there's no match. - If no matching connection exists after checking every page, continue to Step 4.
Step 4: Create the target connection
Follow the same two-lookup-then-create pattern as Step 2 (get_connection_source_names, then get_connection_type, then add_connection) for your target warehouse. For the complete request and response format, refer to the Connections API reference.
Response details
- A successful request returns the new connection, including its
cross_id. - Store this
cross_idas the target connection ID for use in Step 5.
Step 5: Create the multi-table data flow
Send a POST request to the DataFlows API (add_river) to create the data flow, using the source and target connection IDs from the previous steps. List every source table under the source's schemas so that one flow covers the entire set of tables. For the complete request and response format, endpoint, parameters, and examples, refer to the DataFlows API reference.
The target object and each table entry vary by connector type. Confirm the exact fields for your source and target connectors in the reference before building the request.
Example request (MySQL source to Snowflake target)
POST /v1/accounts/{account_id}/environments/{environment_id}/rivers

{
  "name": "orders_multi_table_sync",
  "type": "source_to_target",
  "properties": {
    "properties_type": "source_to_target",
    "source": {
      "name": "mysql",
      "connection_id": "<source connection cross_id from Step 2>",
      "run_type": "multi_tables"
    },
    "target": {
      "name": "snowflake",
      "connection_id": "<target connection cross_id from Step 4>",
      "target_prefix": "raw_",
      "loading_method": "merge"
    },
    "schemas": [
      {
        "name": "orders_schema",
        "tables": [
          {
            "run_type_and_datasource": "multi_tables",
            "details": { "is_selected": true, "target_table": "orders" }
          },
          {
            "run_type_and_datasource": "multi_tables",
            "details": { "is_selected": true, "target_table": "customers" }
          }
        ]
      }
    ]
  }
}
Add one entry under tables per source table to sync. This example covers two tables; extend the array for the rest of your set.
Response details
- A successful request returns the new data flow, including its
cross_id. - Store this
cross_idas the data flow ID for use in Step 6 and Step 7.
Step 6: Activate the data flow
Before activating, send a GET request to the DataFlows API (get_river) to check the data flow's current river_status. Boomi's Data Integration API spec doesn't document what happens if you activate a data flow that's already active, so don't call activate on an assumption. Only continue if river_status is disabled. For the complete request and response format, refer to the DataFlows API reference.
Send a POST request to the DataFlows API (activate_river) to activate the data flow. Activation is asynchronous, so the API returns an operation_id rather than a simple success response. For the complete request and response format, refer to the DataFlows API reference.
Use a GET request to poll the Operations API (get_operation_status) repeatedly with the operation_id until the operation reaches a terminal status. For the complete request and response format, refer to the Operations API reference.
The operation's status field uses the values W, E, R, and D. Boomi's Data Integration API spec doesn't define each value beyond confirming that D indicates completion. Treat D as terminal-success and E as terminal-failure, and treat W and R as in progress.
Response details
- The activation request returns the
operation_idyou use to poll for status. - Repeat the operations request until
statusbecomesD. Trigger a run only after that. - Boomi's Data Integration API spec doesn't publish a recommended polling interval for this endpoint. As a starting point, poll every 10 seconds for the first 2 minutes, then back off to every 30 seconds, and treat a
503response as a signal to back off further rather than poll harder. - Cap the poll loop at a maximum duration, for example 10 minutes. If activation hasn't reached
Dby then, surface the timeout as its own failure. Don't calladd_riveroractivate_riveragain in response to a timeout.
Step 7: Trigger the initial run
Send a POST request to the DataFlows API (run_river) to run the data flow. For the complete request and response format, endpoint, parameters, and examples, refer to the DataFlows API reference.
Response details
- A successful request returns a
run_group_idthat identifies this run across every table in the flow. - Store the
run_group_idfor use in Step 8.
Step 8: Poll run status and confirm results
Use a GET request to poll the Activities API (get_river_activities_run) repeatedly with the run_group_id, passed as the run_id path parameter, until the run reaches a terminal status. For the complete request and response format, endpoint, parameters, and examples, refer to the Activities API reference.
Response details
The API returns different statuses depending on how the run progressed:
pendingandrunningmean the run is still in progress. Keep polling.succeededmeans every table in the flow synced.partially succeededmeans some tables synced but at least one did not. Treat this as a failure that needs investigation, not a full success.failed,canceled, andskippedare also terminal.- The response also includes the tables synced and the row count for each.
Additional considerations
- If the run fails or partially succeeds, call the
get_river_activities_targetsoperation in the Activities API reference to identify which specific table failed, then check itserror_descriptionvalue to classify the error before you retry. - As with activation, Boomi's Data Integration API spec doesn't publish a recommended polling interval or timeout for run status. Apply the same cadence as Step 6, and set an overall wait budget based on your data volume. The data flow's own
run_timeout_secondssetting (configured in Step 5) bounds the run itself, but your polling loop needs its own timeout independent of that setting so your agent doesn't hang waiting on a response. If your loop's own timeout is reached first, surface it as a failure requiring investigation rather than callingrun_riveragain. - This workflow only calls
list_connections,get_connection_source_names,get_connection_type,add_connection,add_river,get_river,activate_river,get_operation_status,run_river,get_river_activities_run, andget_river_activities_targets. Don't calldelete_connection,update_connection,edit_river, ordelete_riveras part of this workflow. For example, ifadd_connectionrejects the request because a matching connection already exists, go back to Step 1 or Step 3 and reuse it, rather than deleting and recreating it.